Using Teamcity, Octopus To Build, Configure & Deploy an Angular 4 App
Last week I was configuring an end-to-end CI/CD pipeline using Teamcity, Angular/Cli and Octopus. Some of the pieces of this puzzle was not straight forward. So, in this post I am going to give you an step-by-step guide as to how I achieved it.
What Are We Going To Do
There are a couple of things we would like to have at the end of this process.
- An App Configuration that can be used to local development as well as changeable for target deployment environment - This will contain the configurations like the URI of the API to call which will be different per DEV, TEST, STAGING & PROD environments.
- A Teamcity build that compiles, builds and packs the App and pushes to Octopus
- Octopus configured to transform the App Configuration to the target deployment environment
Preparing App Configuration for Transformations Using Octopus
Every App needs to have a configuration file which contains the environment specific configurations like the URI of the API to call.
App Config for Local Development
src/assets/js/config.js
window.config = {
    baseUrl: 'http://localhost:4200/api',
};
Adding a Configuration Service
src/app/common/config.service.ts
import { Injectable, Inject } from '@angular/core';

/**
 * Uses window.config to grab the config.
 * Provides the config values to the services.
 */
@Injectable()
export class ConfigService {
    private config: any;

    // AOT Compiler errors if 'Window' is injected here.
    // Will probably be fixed in the angular future.
    constructor() {
        const window = this.getWindow();

        if (window['config']) {
            this.config = window['config'];
            console.log('Configuration loaded ', this.config);
        } else {
            console.warn('No configuration found in window object');
        }
    }

    getWindow(): any {
        return window;
    }

    get baseUrl() {
        return this.config.baseUrl;
    }
}
App Config Template to be Transformed by Octopus
Above configuration src/assets/js/config.js file only contains configuration for my local development. When I deploy however, I want that configuration to be replaced by values matching the environment of interest.
To do this, we leverage a template file of the same format as the above config file with a set of placeholders that Octopus understands. This file will replace the assets/js/config.js file on Nuget Pack. Then we configure Octopus to replace these placeholders with relevant values. Sounds like a plan?
Let’s have a look at the config.template.js file.
app/config/config.template.js
/**
 * This becomes config.js for CI.
 * The placeholders are tranformed by octopus.
 */
window.config = {
    baseUrl: '#{baseUri}',
}
Include a Nuget Config (.nuspec) File
Replacing our temporary assets/js/config.js with the new template file is done by the Nuget Packager.
Here is a nuspec file to do just that while packing our build files.
/sample-app.nuspec
<?xml version="1.0"?>
<package >
  <metadata>
    <id>Sample.App</id>
    <version>1.0.0</version>
    <authors>amil</authors>
    <owners>amil</owners>
    <requireLicenseAcceptance>false</requireLicenseAcceptance>
    <description>Package description</description>
    <releaseNotes>Summary of changes made in this release of the package.</releaseNotes>
    <copyright>Copyright 2017</copyright>
    <!-- for some reason, removing tags and dependencies made the nuget pack executable behave badly :/ -->
    <tags>Tag1 Tag2</tags>
    <dependencies>
      <dependency id="SampleDependency" version="1.0" />
    </dependencies>
  </metadata>
  <files>
    <!-- copy all the files in dist folder to a nuget package, except for the config.js -->
    <file src="dist\**\*.*" target="." exclude="dist\assets\js\config.js"/>
    <!-- copy our config.template.js file as the config.js -->
    <file src="src\app\config\config.template.js" target="assets\js\config.js" />
  </files>
</package>
Build Script for Teamcity to Use Angular/Cli
Build configuration on teamcity is pretty straight forward. Only tricky part is adding a new build target build-prod as below. This target will use angular-cli to build the app.
"scripts": {
    "ng": "ng",
    "start": "ng serve",
    "build": "ng build",
    "build-prod": "ng build --prod",
    "test": "ng test",
    "test-ci": "ng test --single-run --code-coverage --reporters=teamcity",
    "lint": "ng lint",
    "e2e": "ng e2e"
}
Configuring Teamcity Build
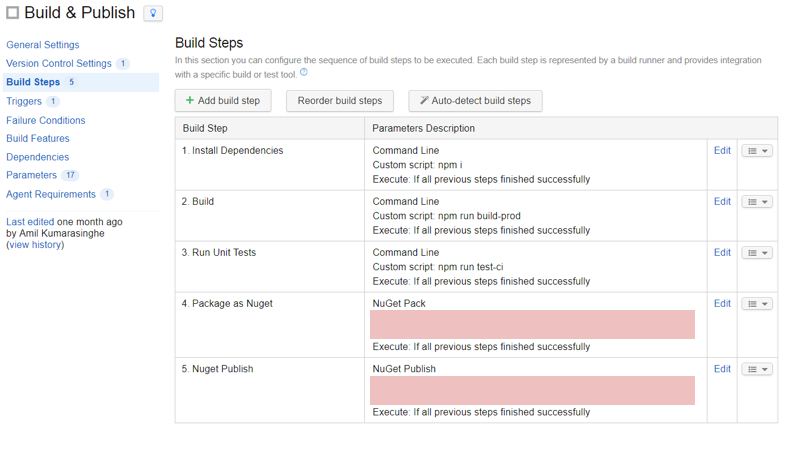
Teamcity configuration will look as below,
First three steps are pretty straight forward. We gotta,
- Install Npm dependencies
- Build (notice I call a command line
npm run build-prodthere. I am executing the target created above) - Run Tests (if you have any)

Generate Nuget Package
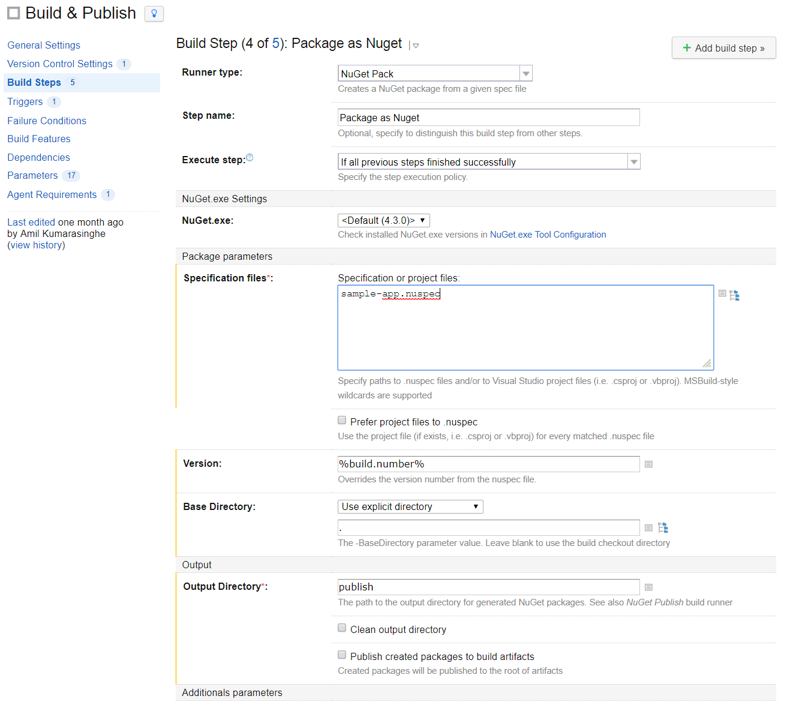
Step 4 is packaging the app to a nuget. We use a Nuget Pack Runner here with our sample-app.nuspec file - this will pack our app along with that template file we created.
Step 5 is pushing that to a package repository - ready to be picked by octopus. You can use the package repository of octopus server itself.

Configuring Octopus
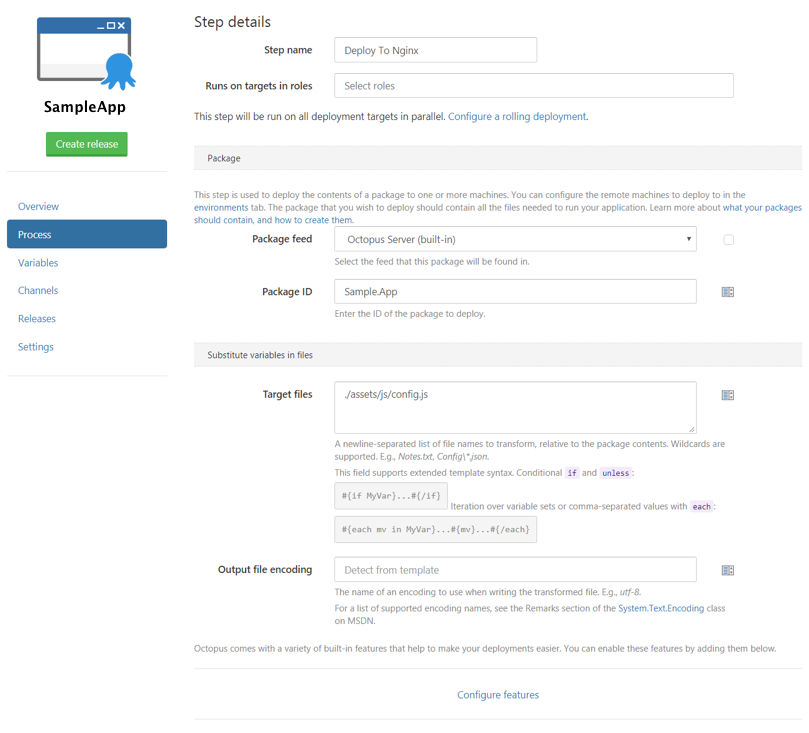
My octopus deployment process has only one step. It deploys the content of the nuget pack to a linux box. I have installed Calamari on the box and added that as a target in octopus. Let me know if you have trouble getting that done. To the simplicity of this post, let’s focus on the deployment process.
There are two additional steps to do here. Substitute variables in files by adding our ./assets/js/config.js (that now contains the template with placeholders).

Configuration Transformations
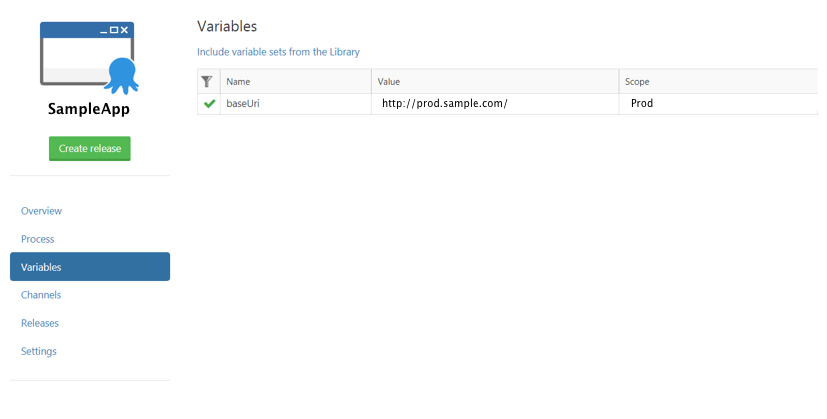
Add relevant values for our baseUrl per each environment. The sample here has my baseUrl replaced with that of PROD environment. We can add other configs here for any other environments we have.

Conclusion
So that’s it. There we have a Build Deploy Pipleline for our Angular 4 app with Configuration Transformations also.
Let me know if you hit any walls.
Cheers!